

Contents
So you've built a Xamarin app and you're ready to release it out into the world — congratulations! This guide will show you how to deploy your Xamarin app on the App Store and Google Play.
0. Prerequisites
- Make sure that you’ve covered Apple’s guidelines for releasing an app on the App Store.
- Have your app’s icons and launch screens ready. For more details, check Xamarin's guide.
- Have an Apple Developer account.
- Have an iOS app distribution certificate.
1. Code signing: Create an iOS distribution provisioning profile
The development provisioning profile and development certificate that you’ve been using are only for specific devices. In order to distribute your app to beta testers or to users through the App Store, you’ll need a separate distribution provisioning profile and distribution certificate. You will also need a unique App ID and setup entitlements. Head to the Apple Developer Portal and follow these steps:
- In the Certificates, IDs & Profiles section, select Identifiers then App IDs.
- Click the + button and add a unique Name and Bundle ID for your application.
- Then select Provisioning Profiles from the menu and then Distribution.
- Click the + button, select App Store, and click Continue.
- Find your app’s App ID from the list, select the App ID, then click Continue.
- Select a Signing Certificate and then click Continue.
- Finally, add a Profile Name and click Continue to generate the profile.
Xamarin's Apple Account Management tools will help you download and install the newly-created provisioning profile.
2. Configure your release build
While Xamarin.iOS projects automatically set up Debug and Release build configurations, we need to make sure that they are properly configured before you can release your app. So from Visual Studio follow these steps:
- Open Info.plist from the Solution Pad and select Manual Provisioning.
- Save and close the file so that you can manually edit the bundle signing.
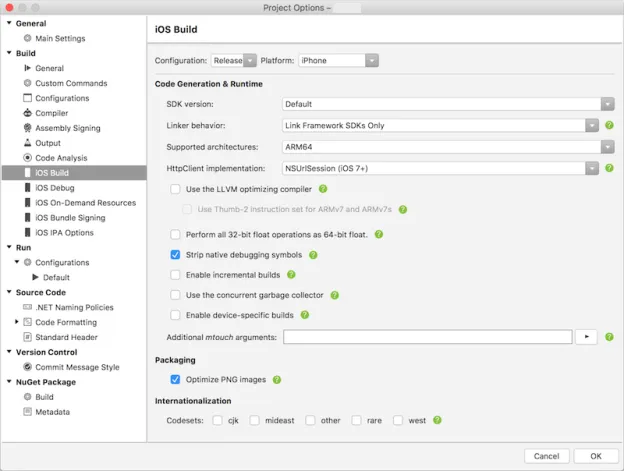
- Right-click on your app’s Project Name in the Solution Pad and select Options, then navigate to the iOS Build tab.
- Configure your build as you see fit. The key part is setting Configuration to Release and Platform to iPhone.
Your configuration should look like this:
3. iOS Bundle Signing
- Navigate to the iOS Bundle Signing tab.
- Like before, set Configuration to Release and Platform to iPhone.
- Set Signing Identity to Distribution (Automatic).
- For Provisioning Profile, make sure to select the App Store provisioning profile created above.
- Click OK to save changes to the project properties.
4. Create an iTunes Connect record for your app
Before you can build and release your app on the App Store you need to set up a place for it using iTunes Connect. This is where you will be able to set up the payment for your app. For details on how to create an iTunes Connect record for your app, check out our guide.
5. Build and submit your app
Now that everything is configured and iTunes Connect is ready for your submission, it's time to build and submit your app to the App Store.
- Back in Visual Studio, select the Release build configuration, and for the device make sure it’s not a simulator.
- From the Build menu, select Archive for Publishing.
- Wait for the Archive to be created, then your app will appear in the Archives table.
- In the bottom right of the view, click Sign and Distribute.
- Select the App Store distribution channel and click Next.
- Select Upload as the destination and click Next.
- In the Provisioning profile window, select your signing identity, app, and provisioning profile and click Next.
- From the App Store Connect information window, you have to select an Apple ID username from the drop-down menu, enter an app-specific password, then click Next.
- All that’s left now is to review the details and click Publish.
That’s it! Your app will now start uploading to the App Store.
0. Prerequisites
- Have your application assets ready (icon, screenshots, promotional and feature graphics).
- Be a registered Google Play Developer (there's a $25 fee).
1. Configure your release build
Similar to iOS, we need to first make sure the project is configured to compile a release build ready for the Google Play Store. So head to your <code>Xamarin.Android</code> project in Visual Studio and follow these steps:
- Right-click the Android project’s name and select Project Options.
- Select the Android Application section from the options under Build.
- Name and version your app and make sure to select an Application icon.
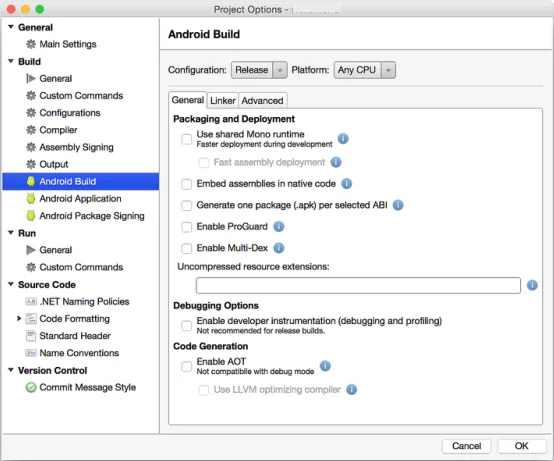
- Select the Android Build section.
- Configure your app build as you see fit, and make sure to set Configuration to Release and Platform to Any CPU. It will look similar to this:
6.Click OK when you’re done.
2. Compile and build your app
- Select Build then Build All to build your app in Release mode.
- Now to publish, select Build again and then Archive for Publishing.
- The Archive Manager will open and you can select your app.
- Click Sign and Distribute on the bottom right.
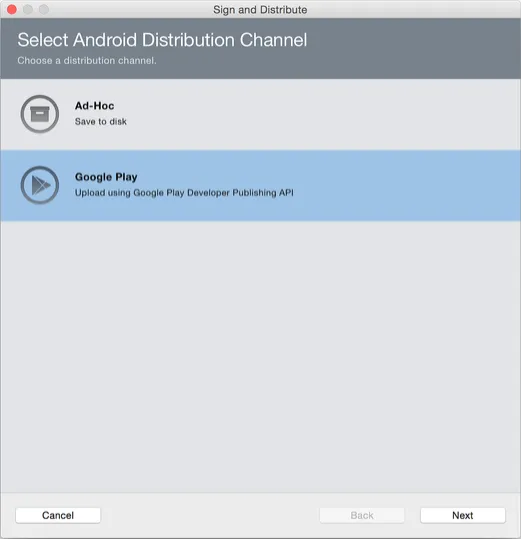
3. Sign and distribute
There are two options for signing and distributing an Android app: You can save the APK and manually upload it to the Google Play Store or you can do it automatically using the Google Play Developer Publishing API. Note that Google Play requires you to manually upload your first APK for this app. You can use an ad-hoc APK for this.
Option 1: Manually upload the APK
- Select Ad-Hoc, then click Next.
- In the Android Signing Identity, click Import an Existing Key (or Create a New Key if you don’t already have one).
- Select your key and then click Next.
- Review the app’s details and then click Publish.
- Save the APK on your computer.
- Follow our guide to manually upload the APK to the Google Play Store.
Option 2: Publish to Google Play directly using an API
- If you already have Google Play Developer Publishing API, set up select Google Play and click Next (if you don't have it set up, check Google's guide).
- Enter the details to register your Google Play API account and then click Register.
- If the Registration Successful message appears, click Next.
- Select the track for your app, then click Next.
- Make sure it’s using an existing key and click Next.
- Review your app’s details and then click Publish.
Congratulations! You’ve now successfully published your app! Note that both Apple and Google take time to review the app before they are available on the stores.
Want to try our latest AI features?
Sign up to the closed beta now
Oops! Something went wrong while submitting the form.
Learn more:
- How to Improve Mobile App Performance
- Instabug vs Firebase
- Instabug vs New Relic
- Mobile App Quality: An Essential Guide
Instabug empowers mobile teams to maintain industry-leading apps with mobile-focused, user-centric stability and performance monitoring.
Visit our sandbox or book a demo to see how Instabug can help your app


